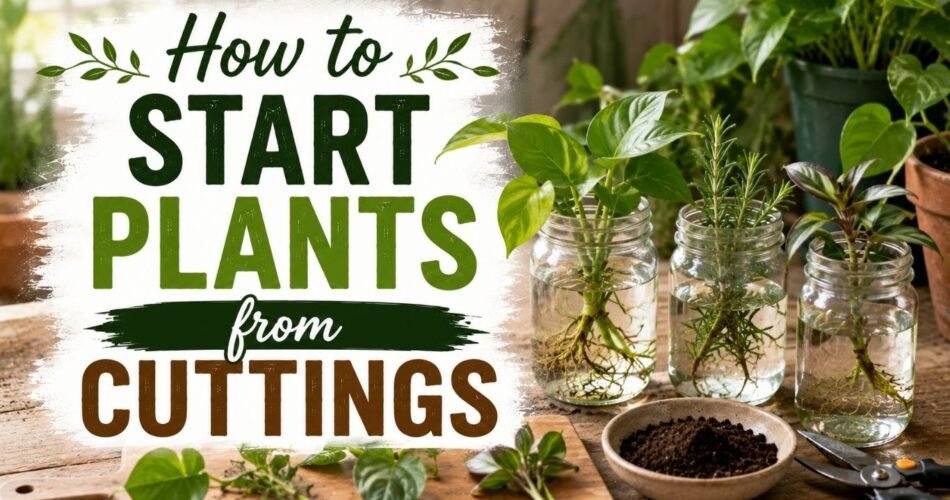
If you’ve ever admired a beautiful plant at a friend’s house and wished you could have one just like it, you’re in luck. Learning how to start plants from cuttings is one of the most rewarding skills any gardener can develop — and it’s a lot easier than most people think.
Plant propagation from cuttings lets you multiply your favorite plants for free, fill your garden with variety, share plants with neighbors, and even save a struggling plant before it dies. Whether you’re a total beginner or someone who has tried and failed before, this guide will walk you through everything step by step.
I’ve been propagating plants for over a decade — from simple herb cuttings on my kitchen windowsill to rooting stubborn woody shrubs in my backyard. The tips and techniques I’m sharing here are drawn from real hands-on experience, not just theory.
Let’s get into it.
What Are Plant Cuttings?
A plant cutting is simply a piece of a living plant — a stem, leaf, or root — that you remove and encourage to grow roots and become an entirely new, independent plant. This process is called vegetative propagation, and it produces plants that are genetically identical to the parent plant.
That’s actually a big deal. When you grow plants from seed, you sometimes get variation. But when you propagate from cuttings, you get an exact clone. So if your parent plant has gorgeous blooms, exceptional fragrance, or a particularly vigorous growth habit, those traits will carry over perfectly to every cutting you take.
People have been propagating plants from cuttings for thousands of years — long before anyone understood the science behind it. Today, commercial nurseries rely heavily on this method because it’s fast, reliable, and cost-effective. And you can do the exact same thing at home with basic tools you probably already have.
Types of Plant Cuttings
Not all cuttings are the same. The type you use depends on the plant you’re propagating and the time of year. Here’s a breakdown of the main categories:
Stem Cuttings
Stem cuttings are the most common type and work for a huge range of plants. You take a section of the stem — including at least one or two nodes (the bumpy points where leaves attach) — and encourage it to grow roots.
Stem cuttings are further divided by the age or maturity of the stem tissue:
Softwood Cuttings
Softwood cuttings are taken from the newest, most tender growth — the soft, flexible tips of actively growing stems. This is usually done in spring and early summer when plants are pushing out fresh growth.
Because the tissue is so young, softwood cuttings root quickly and easily. The downside is they’re also more fragile and prone to wilting. Plants like basil, coleus, chrysanthemums, geraniums, and most herbs are commonly propagated this way.
Semi-Hardwood Cuttings
Semi-hardwood cuttings are taken from stems that have started to mature but aren’t fully woody yet. This is typically mid to late summer material. The stem is firmer and more resilient than softwood, making it slightly easier to handle.
Good candidates include roses, camellias, gardenias, and many broadleaf evergreen shrubs.
Hardwood Cuttings
Hardwood cuttings use fully mature, dormant wood — usually taken in late autumn or winter after a plant has dropped its leaves and gone dormant. These take longer to root (sometimes months), but they’re extremely durable and low-maintenance.
Roses, willows, forsythia, dogwood, and many fruiting shrubs like currants and gooseberries are excellent candidates.
Leaf Cuttings
Some plants can actually regenerate an entire new plant from just a single leaf. This is common with succulents, snake plants, African violets, and begonias.
You simply remove a healthy leaf (sometimes with its stalk attached) and place it in soil or water. Within a few weeks, tiny new plantlets emerge from the base.
Root Cuttings
Root cuttings are less commonly used but worth knowing about. You dig up a section of a plant’s root during dormancy and replant it. As the root section recovers, new shoots sprout from it.
This method works well for plants like Japanese anemone, phlox, trumpet vine, and comfrey.
When Is the Best Time to Take Plant Cuttings?
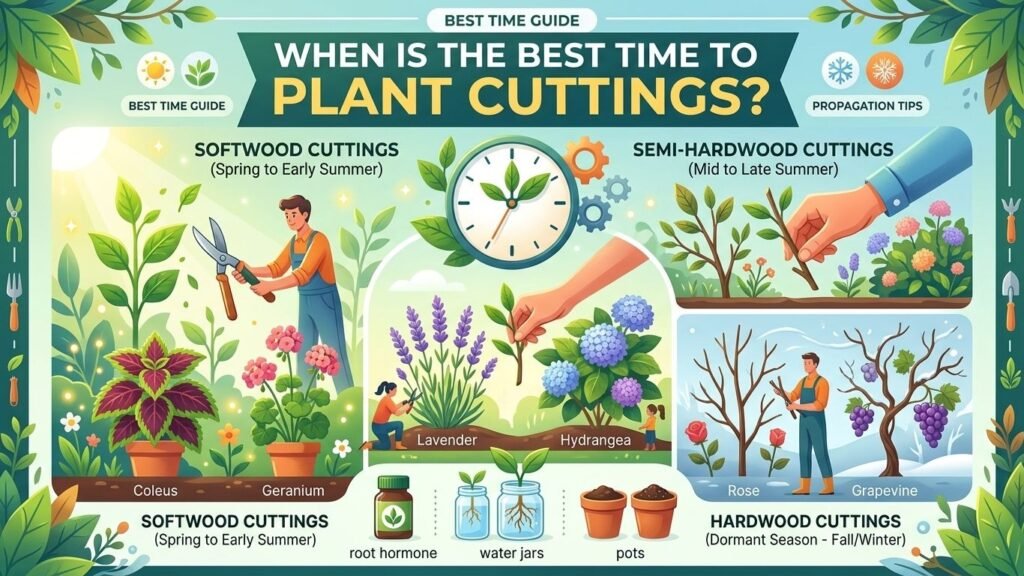
Timing matters more than most beginners realize. Taking a cutting at the wrong time dramatically reduces your chances of success.
General timing guidelines:
- Spring — Best time for softwood cuttings. Plants are actively growing and full of energy.
- Summer — Good for semi-hardwood cuttings. Aim for early morning when plants are most hydrated.
- Autumn/Winter — Ideal for hardwood cuttings. The plant is dormant but the stem tissue is mature and robust.
- Year-round — Tropical houseplants can usually be propagated any time as long as they’re actively growing.
A practical tip: take cuttings on a cool, overcast day rather than during blazing heat. Plants stressed by sun and high temperatures lose moisture more quickly, which makes fresh cuttings more likely to wilt before roots develop.
Choosing Healthy Parent Plants
Your cutting is only as good as the plant it came from. This point gets overlooked surprisingly often.
What to look for in a parent plant:
- Healthy and vigorous — No signs of disease, pests, or nutrient deficiency
- Not currently flowering — A plant in bloom is putting its energy into reproduction, not root development. If possible, take cuttings before the plant flowers, or remove any buds from your cutting.
- Well-watered — Water the parent plant thoroughly 24 hours before taking cuttings. Hydrated stems root better.
- True to type — Make sure the plant is the exact variety you want to reproduce. Avoid variegated plants propagated through root cuttings, as the new plants may revert to plain green.
One thing I always do before taking cuttings: I walk around the plant and look for the most vigorous, bushy sections. Those side shoots with strong internodes (the space between leaf nodes) are the ones I target.
Tools You’ll Need
You don’t need expensive equipment, but you do need clean, sharp tools.
Essential Tools:
- Sharp pruning shears or a clean knife — The most important tool. A dull blade crushes stem tissue, which slows rooting or causes rot.
- Small containers or pots — 3 to 4-inch pots work well for most cuttings.
- Rooting medium — More on this below.
- Clear plastic bags or a humidity dome — To retain moisture.
- Rooting hormone (optional but helpful) — Powder, gel, or liquid forms.
- Labels and a marker — Trust me, you’ll forget what’s what.
Sterilizing Your Tools
This is non-negotiable. Before you make a single cut, wipe your blades with rubbing alcohol or dip them in a 10% bleach solution. Dirty tools spread fungal diseases and bacteria directly into your cutting’s fresh wound, and that almost always means failure.
How to Prepare Your Rooting Medium
The growing medium you use for cuttings is different from regular garden soil or potting mix. Standard potting soil is too dense and often too nutrient-rich — high nitrogen actually encourages leafy growth instead of root development, which is the opposite of what you want.
Good rooting mediums include:
- Perlite — Excellent drainage and aeration. Can be used alone or mixed with other materials.
- Vermiculite — Holds moisture well. Good mixed with perlite.
- Coarse sand — Traditional and effective for hardwood cuttings.
- A 50/50 mix of perlite and peat moss or coco coir — A reliable all-purpose mix.
- Propagation-specific mixes — Available at garden centers and work well straight from the bag.
Fill your containers with moistened rooting medium before you take your cuttings. Everything should be ready so you can move quickly once cuts are made.
Step-by-Step Guide: How to Take Stem Cuttings
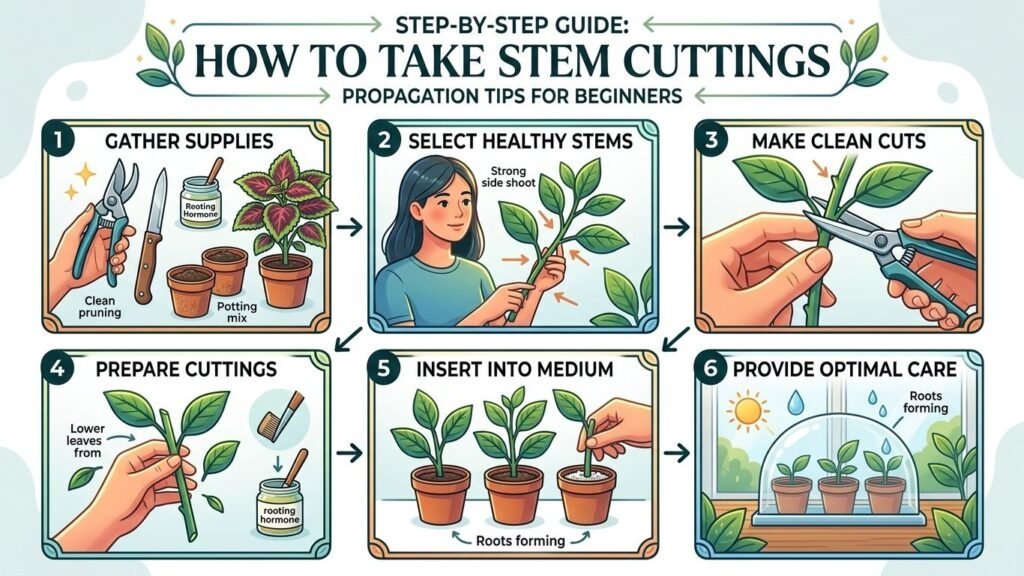
Here’s my standard process for stem cuttings — the most common type you’ll use.
Step 1: Prepare Your Materials
Gather your clean cutting tool, prepared containers with moist rooting medium, rooting hormone if you’re using it, and plastic bags or a humidity dome.
Step 2: Select Your Cutting
Look for a healthy stem with at least 2 to 4 leaf nodes. Ideally, your cutting should be 3 to 6 inches long. Avoid stems that look weak, yellowed, or have signs of insect damage.
Step 3: Make the Cut
Cut just below a node (the point where a leaf joins the stem) at a 45-degree angle. The angled cut increases the surface area exposed to the rooting medium, which helps more roots form. Make the cut in one smooth, firm motion — don’t saw back and forth.
Step 4: Strip Lower Leaves
Remove the leaves from the lower third to half of the cutting. Any leaves buried in your rooting medium will rot and introduce disease. Leave 2 to 3 leaves at the top so the cutting can still photosynthesize, but if those leaves are large, cut them in half to reduce moisture loss.
Step 5: Apply Rooting Hormone (Optional)
Dip the cut end into rooting hormone powder, gel, or liquid. If using powder, tap off the excess — too much can actually inhibit rooting. If using gel, coat the cut end and the bottom inch of the stem.
Rooting hormone contains auxins — naturally occurring plant hormones that stimulate root development. You don’t always need it, but it significantly improves success rates on plants that are slow to root, like roses or camellias.
Step 6: Insert Into Rooting Medium
Use a pencil or chopstick to make a small hole in your rooting medium first. This prevents the rooting hormone from rubbing off as you push the cutting in. Insert the cutting about 1 to 2 inches deep, then gently firm the medium around it.
Step 7: Create a Humid Environment
Place a clear plastic bag over the container or cover with a humidity dome. This traps moisture and reduces the amount of water the cutting loses through its leaves. Since it has no roots yet, it can’t pull water from the soil — maintaining humidity around the leaves is critical.
Step 8: Find the Right Spot
Place your cuttings in bright, indirect light. Avoid direct sun — it will cook them. A north-facing windowsill, a spot under grow lights, or a shaded greenhouse bench is ideal.
Aim for temperatures between 65°F and 75°F (18°C to 24°C). Warm soil temperatures speed up rooting, which is why heat mats designed for propagation are useful, especially in cooler climates.
Rooting in Water vs. Soil: Which Is Better?
Both methods work, but they each have advantages and drawbacks. Here’s the honest truth about both.
Water Propagation
How to do it: Simply place your prepared cutting (stripped of lower leaves) in a glass or jar of clean water, ensuring the nodes are submerged but the leaves are not. Place it in bright, indirect light. Change the water every few days to prevent bacteria buildup.
Pros:
- You can watch roots develop — very satisfying and educational
- No rooting medium needed
- Works incredibly well for certain plants
Cons:
- Water roots are structurally different from soil roots — the plant has to adjust when transplanted, and there’s sometimes a transition shock
- Risk of rot if water is not changed regularly
- Not all plants root well in water
Best plants for water propagation: Pothos, philodendrons, mint, basil, coleus, impatiens, begonias, tradescantia, and most soft-stemmed houseplants.
If you’re looking to expand your indoor plant collection on a budget, water propagation is the easiest place to start — especially for low-light varieties. Check out this helpful list of 5 Indoor Plants That Grow Without Sunlight for great candidates that root easily in water.
Soil Propagation
How to do it: Insert cuttings into a prepared rooting medium, maintain humidity, and wait.
Pros:
- Roots develop in the medium they’ll continue growing in — no transplant shock transition
- Handles a wider variety of plants
- Better for woody and semi-hardwood cuttings
Cons:
- Can’t see roots forming without disturbing the cutting
- Requires more attention to moisture and humidity levels
Best plants for soil propagation: Roses, hydrangeas, lavender, fuchsias, herbs, geraniums, and most woody shrubs.
Using Rooting Hormone: Do You Really Need It?
Rooting hormone is genuinely useful, but it’s not always necessary. Easy-to-root plants like mint, pothos, or basil will root happily without it. Trickier plants like roses, magnolias, or gardenias benefit noticeably from its use.
Forms of rooting hormone:
- Powder — Affordable, widely available, has a long shelf life. Good for most uses.
- Gel — Sticks well to the stem, provides good coverage. Particularly useful for hardwood cuttings.
- Liquid — Can be diluted to different strengths. Useful for large batches.
Tips for using rooting hormone:
- Don’t dip directly from the container — pour a small amount into a separate dish to avoid contaminating the whole bottle
- Store in a cool, dark place to preserve potency
- Check the expiration date — old rooting hormone loses effectiveness
- Natural alternatives include willow water (soaking willow stems in water for 24 hours releases natural auxins) and aloe vera gel, which has mild rooting properties
Aftercare: Helping Your New Plants Thrive
Propagation doesn’t end at transplanting. The first few weeks after potting are critical.
Hardening Off (for outdoor plants)
If your cuttings were propagated indoors and will eventually live outside, harden them off gradually. Start by placing them outdoors in a sheltered spot for an hour or two each day, gradually increasing exposure over 7 to 10 days before leaving them out full-time.
Watering
New plants are sensitive. Keep the soil consistently moist but never waterlogged. Overwatering is one of the fastest ways to kill newly propagated plants.
Fertilizing
Wait at least 4 to 6 weeks before fertilizing. Young root systems are tender and can be burned by fertilizer. When you do start, use a diluted balanced liquid fertilizer.
Pruning
Once the plant is established and putting out new growth, pinch back the growing tips to encourage a bushy, full shape rather than tall, leggy growth.
If you’re propagating plants like herbs that you plan to harvest and preserve, it’s worth learning about How to Dry and Preserve Herbs so you can make the most of your harvest once your cuttings are fully established.
Easy Plants to Propagate from Cuttings
If you’re just starting out, these plants are forgiving and root reliably:
Easiest Indoor Plants:
- Pothos — Drop a stem in water and forget about it for two weeks. Roots appear almost without any effort.
- Spider Plant — The little “spiderettes” that dangle from the parent plant are ready to root with almost no encouragement.
- Tradescantia (Spiderwort) — Fast-rooting in either water or soil.
- Philodendron — Similar to pothos; extremely easy in water.
- Snake Plant — Leaf cuttings work well, though variegated varieties revert to plain green.
Speaking of easy-care indoor plants, some of the best propagation candidates also happen to be fantastic for indoor air quality. Take a look at 6 Air Purifying Plants for a Healthier Home — several of these are also incredibly simple to propagate from cuttings.
Easiest Outdoor Plants:
- Mint — Practically roots if you look at it the right way. Excellent for beginners.
- Rosemary — Takes a little longer but very reliable from semi-hardwood cuttings.
- Lavender — Softwood or semi-hardwood cuttings in summer. One of my favorites to propagate.
- Geraniums (Pelargoniums) — Almost foolproof from softwood cuttings.
- Hydrangeas — Softwood cuttings in spring root beautifully under a humidity dome.
- Forsythia and Willows — Hardwood cuttings in winter are nearly guaranteed to succeed.
- Coleus — Roots in water within a couple of weeks.
If you enjoy container gardening, you can even propagate plants specifically for pot displays. For instance, once you’ve mastered the basics of propagation, you might enjoy growing a pollinator-friendly display — like what’s described in this guide on How to Grow Beautiful Marigolds in Pots.
Signs That Your Cuttings Have Successfully Rooted
One of the trickiest parts of propagation is knowing when your cutting has actually rooted, since you can’t see what’s happening underground. Here’s what to watch for:
- Resistance when tugged gently — The single most reliable test. If the cutting doesn’t pull out easily, roots are anchored in.
- New leaf growth — Fresh leaves emerging from nodes is a very good sign. A plant can’t push new growth without roots to support it.
- Visible roots in water — For water propagation, this is obvious and very satisfying to watch.
- Roots emerging from drainage holes — In a clear or semi-transparent pot, you can sometimes see root tips reaching the edge.
- The cutting looks perky rather than wilted — A wilted or drooping cutting that suddenly stands firm and looks healthy has almost certainly rooted.
How long does it take? It varies considerably by plant type, time of year, and conditions:
- Soft herbaceous plants: 1–3 weeks
- Semi-hardwood cuttings: 4–8 weeks
- Hardwood cuttings: 8–16 weeks
- Leaf cuttings (succulents): 2–6 weeks
Common Propagation Mistakes to Avoid
Even experienced gardeners make these mistakes. Knowing them in advance gives you a real head start.
1. Using Dirty or Dull Tools
Already mentioned, but worth repeating. Dull blades crush stem tissue. Dirty blades introduce pathogens. Always clean and sharpen before cutting.
2. Taking Cuttings at the Wrong Time
Trying to propagate a plant when it’s stressed, dormant (for softwood types), or in full bloom reduces success dramatically. Match your cutting type to the right season.
3. Letting Cuttings Dry Out
Once cut, a stem starts losing moisture immediately. Have your containers ready before you cut, and get cuttings into their medium as quickly as possible.
4. Overwatering
It’s a very common instinct — the cutting looks stressed, so you water more. But soggy rooting medium suffocates roots and causes rot. Keep it moist but not wet.
5. Too Much Direct Sunlight
Direct sun wilts unrooted cuttings fast. Bright, indirect light is what you want until roots are well established.
6. Disturbing Cuttings Too Often
It’s tempting to check for roots every day by pulling the cutting out. Every time you do this, you risk breaking delicate new roots. Be patient.
7. Using the Wrong Rooting Medium
Regular potting soil or garden soil are too dense and too rich in nutrients. Stick with perlite, vermiculite, coarse sand, or a proper propagation mix.
8. Not Labeling Your Cuttings
When you take multiple types of cuttings in one session, they all look remarkably similar. Label everything immediately — plant name, date taken, and propagation method.
9. Skipping Humidity
Especially for softwood cuttings, maintaining humidity is essential. Without it, the cutting dries out before it can root. Use a plastic bag, dome, or improvised cover.
10. Giving Up Too Soon
Some cuttings take much longer than you expect. I’ve had hardwood rose cuttings that seemed completely dead suddenly push out new growth after three months. Unless there’s obvious rot, give it time.
FAQ: How to Start Plants from Cuttings
1. Can all plants be propagated from cuttings?
Not all plants can be propagated this way. Plants protected by patents (many modern hybrid varieties are patented) legally cannot be propagated without permission. Some plants also simply don’t root from cuttings — certain palms, most tap-rooted plants, and some monocots are better propagated by seed or division. However, the vast majority of common garden plants and houseplants can be successfully propagated from cuttings.
2. Do I always need rooting hormone?
No. Many plants — especially herbs, pothos, philodendrons, coleus, and mint — root happily in water or soil without any rooting hormone. However, for plants known to be slow or difficult to root (roses, gardenias, rhododendrons), rooting hormone significantly improves your chances and speeds up the process.
3. How often should I water cuttings?
The rooting medium should feel like a wrung-out sponge — moist but never soggy. Check every day or two and water sparingly if it’s drying out. In a sealed humidity dome, moisture loss is minimal and you may only need to water every week or so.
4. Can I propagate from cuttings in winter?
Yes, but it depends on the plant and method. Hardwood cuttings are specifically taken in winter. Tender plants and houseplants can also be propagated indoors year-round if you have adequate warmth and light. Avoid trying to take softwood cuttings from dormant outdoor plants in winter — there’s simply no suitable growth to work with.
5. Why are my cuttings dying even though I’m following the steps?
The most common culprits are overwatering, insufficient humidity, disease from unclean tools, or incorrect timing. Review your process step by step. Also check whether the variety you’re attempting is actually one that can be propagated from cuttings, and confirm you’re cutting from the right part of the plant.
6. How many cuttings should I take at once?
Always take more than you need. Even experienced gardeners don’t expect 100% success. Taking three to five cuttings per variety gives you a comfortable buffer. As you gain experience, your success rate will climb, but having backups is always smart.
7. What’s the difference between propagating in water vs. soil for houseplants?
Water propagation is more visually satisfying, easier for absolute beginners, and works brilliantly for soft-stemmed houseplants. The potential downside is that water-grown roots sometimes struggle briefly when transitioning to soil. Soil propagation produces roots that are immediately adapted to growing in the medium, making transplanting easier — but you can’t see what’s happening. Either method works well for most common houseplants; choose whichever feels more manageable for you.
Conclusion
Learning how to start plants from cuttings opens up a whole new world of gardening. Once you get comfortable with the basics, you’ll find yourself looking at every plant differently — not just seeing what it is today, but imagining the dozen new plants it could become.
The beauty of this skill is that it costs almost nothing. A sharp knife, some water or simple rooting mix, and a bit of patience are really all you need to multiply your garden indefinitely. Over time, you’ll get a feel for which plants root easily, when to take cuttings, and how to troubleshoot problems — and that knowledge sticks with you forever.
Start simple. Snip a stem from your pothos, drop it in a glass of water on the windowsill, and watch roots appear. That small success builds the confidence to try more challenging plants. Before long, you’ll have more plants than you can handle — which means more to give away, more to experiment with, and a garden that’s entirely your own creation.
Happy propagating.