There’s something bittersweet about watching a beautiful bouquet slowly fade. Whether it’s roses from your garden, wildflowers you gathered on a walk, or blooms from a special occasion, losing them feels like losing a little piece of a memory. The good news? You don’t have to let that happen.
Preserving flowers at home is one of those skills that sounds complicated but is actually very approachable once you understand the basics. I’ve been gardening and preserving flowers for over a decade, and I can tell you that most methods require nothing more than supplies you probably already have at home.
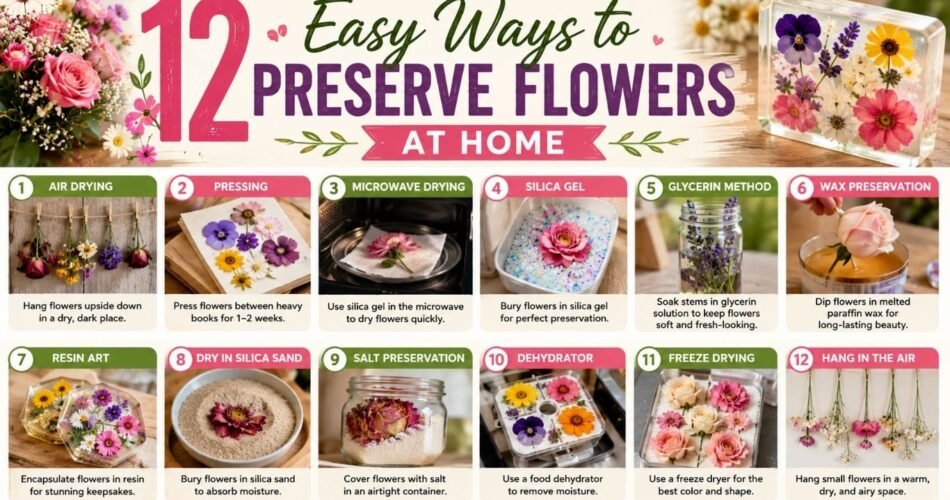
In this guide, I’ll walk you through 12 practical, tried-and-true flower preservation methods. For each one, I’ll explain exactly how it works, what flowers do best with it, how long it takes, and what mistakes to avoid so you don’t waste your blooms. Whether you’re a complete beginner or you’ve tried air drying and want to explore more options, there’s something here for you.
Let’s get into it.
Why Preserve Flowers in the First Place?
Before we dive into the methods, it’s worth thinking about why flower preservation matters and what you hope to get out of it.
People preserve flowers for all kinds of reasons:
- To keep a wedding bouquet or anniversary flowers as a keepsake
- To use dried blooms in wreaths, shadow boxes, or home décor
- To make botanical art or pressed flower crafts
- To preserve flowers from a garden before winter
- To use in herbal teas, skincare, or potpourri
Each purpose calls for a slightly different approach. A pressed flower looks beautiful in a frame but won’t work well in a wreath. Silica-dried flowers hold their shape perfectly but can be fragile. Knowing your end goal before you start will save you a lot of frustration.
Also worth noting: harvest your flowers at the right time. For most preservation methods, you want blooms that are just past bud stage, fully open but not overblown. Early morning is the best time to cut flowers when their water content is well-balanced. Avoid flowers with any signs of browning, disease, or pest damage.
1. Air Drying (The Classic Method)
When to use it: Air drying is the most beginner-friendly method and works well for most hardy flowers. If you’re just starting out with flower preservation, this is the place to begin.
How It Works
Air drying simply removes moisture from the flower over time by allowing air to circulate around the blooms. It’s slow, but it’s reliable and costs nothing.
Step-by-Step Instructions
- Cut your flowers when they’re about three-quarters open — not fully bloomed.
- Remove all leaves from the stems (leaves tend to mold before they dry).
- Bundle 5–10 stems together with a rubber band. Don’t pack them too tightly or the blooms will press against each other.
- Hang the bundles upside down in a dry, dark, well-ventilated space — a closet, garage, or shed works well.
- Leave them undisturbed for 2–4 weeks.
- Once dried, store or use immediately.
Advantages
- Completely free
- Requires no special equipment
- Works for a wide variety of flowers
- Great for large quantities
Disadvantages
- Colors fade significantly (especially pinks and purples)
- Blooms can shrink and become brittle
- Takes the longest of all methods
Best Flowers for Air Drying
Lavender, statice, baby’s breath, roses, strawflowers, globe amaranth, yarrow, and larkspur respond especially well to air drying because they naturally have lower moisture content.
Estimated Drying Time
2 to 4 weeks depending on humidity and flower type.
Common Mistakes to Avoid
- Using a damp or poorly ventilated space. Humidity is your enemy here. Mold is the most common reason air drying fails.
- Drying flowers in direct sunlight. Sunlight speeds up color fading dramatically.
- Waiting too long to harvest. Fully open flowers lose petals more easily when dry.
Tips for Maintaining Color and Shape
Hang flowers in complete darkness to slow color fading. Some gardeners lightly spray finished blooms with hairspray to help them hold their shape. It’s not a perfect solution, but it reduces petal drop.
2. Pressing Flowers
When to use it: Pressing is perfect when you want flat, two-dimensional preserved flowers for framing, card making, journaling, or decoupage projects.
How It Works
Pressing removes moisture by compressing the flower under weight while absorbent material draws out the water. It’s one of the oldest flower preservation techniques in existence.
Step-by-Step Instructions
- Choose flat or semi-flat flowers for best results. Thick, multi-layered blooms don’t press as well.
- Open a heavy book (a large dictionary or plant encyclopedia works great) and place a sheet of parchment or blotting paper on the page.
- Arrange your flowers face-down on the paper, spacing them so they don’t overlap.
- Place another sheet of paper on top, then close the book carefully.
- Stack more heavy books on top for added weight.
- Leave for 2–4 weeks, checking after the first week to make sure there’s no mold.
- Carefully remove the pressed flowers using tweezers.
Advantages
- Inexpensive and simple
- Preserves delicate, flat blooms beautifully
- Great for art projects and home crafts
Disadvantages
- Only works for flat flowers or individual petals
- Long drying time
- Flowers are fragile once pressed
Best Flowers for Pressing
Pansies, violets, cosmos, daisies, ferns, single-layer roses, larkspur petals, and Queen Anne’s lace are all excellent choices. If you’re growing hibiscus and want to preserve individual petals, pressing works well — though you’ll want to check out these 7 Hibiscus Flower Care Tips That You Need to Know first to make sure your blooms are healthy before you harvest.
Estimated Drying Time
2 to 4 weeks.
Common Mistakes to Avoid
- Using flowers with too much moisture. Wet flowers mold before they dry. Let freshly cut flowers sit in a vase for a day first.
- Rushing the process. Removing pressed flowers too early means they’ll curl or continue to decay.
- Not using absorbent paper. Regular printer paper doesn’t absorb moisture well enough.
Storage Advice
Store pressed flowers flat between sheets of wax paper in a dry location. Avoid humidity at all costs.
3. Silica Gel Drying
When to use it: Silica gel is the go-to method when you want to preserve flowers that look as close to fresh as possible. It’s excellent for delicate, multi-petaled blooms that don’t air dry well.
How It Works
Silica gel is a desiccant — it absorbs moisture rapidly and efficiently. When flowers are buried in it, moisture is pulled out quickly while the petals hold their shape.
Step-by-Step Instructions
- Purchase silica gel crystals from a craft store or online. Make sure it’s the flower-drying type, not the small packets from shoeboxes.
- Pour a 1-inch layer of silica gel into an airtight container with a lid.
- Place your flowers face-up on top of the gel layer.
- Carefully pour more silica gel over and around the petals, gently working it between layers with a toothpick or small brush.
- Seal the container tightly.
- For most flowers, check after 2–5 days. Petals should feel papery but not brittle.
- Gently pour out the silica gel and use a soft brush to remove any residue.
Advantages
- Preserves color beautifully
- Maintains three-dimensional shape
- Works for thick, layered flowers that other methods can’t handle
- Silica gel can be reused many times after drying it in the oven at low heat
Disadvantages
- Initial cost for silica gel
- Flowers can become brittle if left in too long
- Requires careful handling
Best Flowers for Silica Gel
Roses, dahlias, peonies, zinnias, sunflowers, tulips, and camellias are all excellent candidates. These are fuller, multi-petaled flowers that need the structure-preserving benefits of silica gel.
Estimated Drying Time
2 to 7 days depending on flower density and moisture content.
Common Mistakes to Avoid
- Not covering petals completely. Any exposed petals will shrivel unevenly.
- Leaving flowers in too long. Over-drying makes petals extremely fragile and prone to shattering.
- Skipping the airtight seal. An open container means the silica gel absorbs ambient humidity instead of just the flower moisture.
4. Microwave Drying with Silica Gel
When to use it: When you want silica gel results in a fraction of the time. This method takes minutes instead of days.
How It Works
Combining microwave heat with silica gel’s absorbing power speeds up moisture removal dramatically.
Step-by-Step Instructions
- Follow the same process as standard silica gel drying, but use a microwave-safe container.
- Leave the lid off the container.
- Microwave on medium-low power (about 40%) for 2–3 minutes.
- Let the container cool completely before opening — this is important.
- Carefully check the flowers. If petals still feel soft, microwave in additional 30-second intervals.
- Once done, let the flowers sit in the closed (but no longer microwaved) container for 24 hours to finish setting.
Advantages
- Dramatically faster than other methods
- Retains color well
- Good for when you need preserved flowers quickly
Disadvantages
- Easier to over-dry and damage flowers
- Requires careful monitoring
- Not suitable for all flower types
Best Flowers for Microwave Drying
Roses, zinnias, and marigolds work especially well. Avoid very delicate petals like sweet peas — they tend to become overly crispy.
Estimated Drying Time
2–3 minutes in the microwave, plus 24 hours resting time.
Common Mistakes to Avoid
- Using high microwave power. High heat will cook your flowers rather than dry them.
- Opening the container immediately. Let it cool completely first or you risk steam damage.
5. Glycerin Preservation
When to use it: Glycerin preservation is ideal when you want preserved flowers and foliage that remain soft and pliable rather than brittle. It’s particularly popular for preserving leaves and stems alongside blooms.
How It Works
Glycerin replaces the water inside the plant cells, preventing them from drying out and becoming brittle. The result is a preserved plant that feels almost leathery and natural.
Step-by-Step Instructions
- Mix one part glycerin (available at pharmacies and craft stores) with two parts warm water in a tall vase or jar.
- Stir well until fully combined.
- Trim about an inch off the stems at a diagonal angle and immediately place them in the glycerin solution.
- Place the arrangement in a cool, dimly lit location.
- Leave for 2–6 weeks. You’ll notice the leaves and petals gradually change color as glycerin replaces the water.
- Remove when the stems feel supple throughout. Pat dry and hang upside down for a day to remove excess solution.
Advantages
- Flowers and foliage stay soft and flexible, not brittle
- Works beautifully for leaves, eucalyptus, and branches
- Long-lasting results — often years
Disadvantages
- Colors change significantly (usually darken to tans and browns)
- Takes a long time
- Glycerin has a cost
Best Plants for Glycerin Preservation
Eucalyptus, magnolia leaves, oak leaves, ferns, beech, and some grasses do exceptionally well. Flowers with open stems like roses and hydrangeas also respond well.
Estimated Time
2 to 6 weeks.
Common Mistakes to Avoid
- Using old or wilted stems. The plant needs to be able to draw up the glycerin solution, so fresh cuts are essential.
- Expecting bright colors. Glycerin preservation almost always results in muted, earth-toned colors. It’s beautiful, just different.
6. Wax Dipping
When to use it: Wax dipping is a great method for creating unique decorative pieces where you want to preserve both the shape and color while adding a slight translucent glow to the petals.
How It Works
Dipping flowers in melted paraffin wax seals moisture inside the petals temporarily and creates a protective coating that slows deterioration.
Step-by-Step Instructions
- Melt paraffin wax in a double boiler. Do not use direct heat — paraffin is flammable.
- Heat to approximately 130°F (55°C). Use a thermometer.
- Hold each flower by the stem and dip it quickly into the wax, then immediately remove it.
- Hold upright for a few seconds while the wax sets.
- For thicker coverage, dip a second time after the first coat hardens.
- Hang to dry fully for a few hours.
Advantages
- Creates an unusual, beautiful decorative piece
- Adds some structural support to petals
- Works quickly
Disadvantages
- Preservation is temporary — weeks to months, not years
- Requires careful handling of hot wax
- Colors can look slightly washed out under thick wax coats
Best Flowers for Wax Dipping
Roses, tulips, and gardenias work well because of their sturdy petal structure. Delicate flowers tend to fall apart during dipping.
Estimated Drying Time
A few hours for the wax to fully set.
Common Mistakes to Avoid
- Overheating the wax. Too hot and you’ll damage the petals before the wax even coats them.
- Dipping too slowly. A quick in-and-out motion gives the best coating.
7. Freeze Drying
When to use it: Freeze drying produces the most professionally preserved flowers — they look almost exactly like fresh blooms. However, this method requires a freeze drying machine, so it’s more of an investment.
How It Works
Freeze drying (also called lyophilization) freezes the flowers first, then uses a vacuum to remove the ice crystals without passing through a liquid phase. This preserves cellular structure almost perfectly.
Step-by-Step Instructions
- Place fresh flowers in the freeze dryer tray, arranged so they’re not touching.
- Run the freeze drying cycle according to your machine’s instructions. Most home freeze dryers cycle for 24–48 hours for flowers.
- Once complete, remove flowers carefully and immediately seal in an airtight container to prevent moisture reabsorption.
Advantages
- Best color and shape retention of any method
- Very long-lasting — properly stored freeze-dried flowers can last decades
- Works for almost any flower
Disadvantages
- Home freeze dryers cost $2,000–$5,000+
- Many people opt to send flowers to professional freeze drying services instead
- Flowers are fragile once freeze dried
Best Flowers for Freeze Drying
Nearly any flower works, including wedding bouquets, roses, dahlias, and orchids. Professional services often preserve entire bridal bouquets this way.
Estimated Time
24 to 48 hours in the machine, though professional services may take 2–4 weeks including shipping.
Common Mistakes to Avoid
- Not sealing immediately after removal. Freeze dried flowers absorb humidity very quickly and will start to wilt if left exposed.
8. Sand Drying
When to use it: Sand drying is an old traditional method that’s been used for centuries. It works similarly to silica gel but uses clean, dry sand instead.
How It Works
Dry sand absorbs moisture from flowers as it surrounds and supports them, preserving their shape.
Step-by-Step Instructions
- Use fine-grained, clean dry sand — kiln-dried sand or sandbox sand works well.
- Spread a 1-inch layer in the bottom of a box or container.
- Place flowers face-up and cover carefully with more sand, working it between petals gently.
- Leave in a warm, dry location for 2–3 weeks.
- Slowly pour out sand when finished and gently brush off residue.
Advantages
- Inexpensive — sand is easy to find
- Works reasonably well for three-dimensional flowers
- A good alternative if silica gel isn’t available
Disadvantages
- Sand is heavy and can crush delicate petals
- Slower and less effective than silica gel
- Color retention isn’t as good as modern methods
Best Flowers for Sand Drying
Marigolds, zinnias, and dahlias hold up well to the weight of sand. Avoid very delicate flowers.
Estimated Drying Time
2 to 3 weeks.
Common Mistakes to Avoid
- Using wet or impure sand. Any moisture in the sand will introduce mold.
- Pouring sand too quickly. Rushing this step crushes petals.
9. Epoxy Resin Casting
When to use it: Epoxy resin isn’t exactly a drying method, but it is a preservation method — and one that creates stunning, permanent pieces. This is perfect for turning flowers into jewelry, paperweights, coasters, or decorative objects.
How It Works
Flowers are embedded in liquid epoxy resin, which then hardens around them, encasing the bloom permanently in a clear, glass-like material.
Step-by-Step Instructions
- Important: Flowers must be fully dried before casting in resin. Use air drying or silica gel first.
- Mix resin and hardener according to the product’s instructions (ratios vary by brand).
- Pour a base layer of resin into your mold and let it partially cure until tacky.
- Place your dried flower on the tacky layer.
- Carefully pour more resin over the flower, fully encasing it.
- Pop any bubbles with a heat gun or by breathing gently across the surface.
- Allow to cure fully — usually 24–72 hours depending on the brand.
Advantages
- Creates beautiful, permanent art pieces
- Protects flowers from humidity, light, and handling
- Endless creative possibilities
Disadvantages
- Requires pre-dried flowers
- Resin can be expensive
- Working with resin requires proper ventilation and gloves
- Learning curve to get bubble-free results
Best Flowers for Resin Casting
Small flat flowers work best — pansies, daisies, pressed roses, and violas. Thick flowers can sometimes trap air bubbles.
Estimated Time
Preparation: however long your drying method takes. Resin curing: 24–72 hours.
Common Mistakes to Avoid
- Using fresh flowers. Moisture inside flowers causes cloudiness and deterioration inside the resin.
- Skipping protective gear. Uncured resin is a skin irritant. Always wear gloves and work in a ventilated area.
10. Borax and Cornmeal Mixture
When to use it: This is another old-fashioned desiccant method that predates silica gel. It’s a good option if you want a more natural, low-cost drying agent.
How It Works
A mixture of borax and cornmeal draws moisture from flowers in a similar way to sand or silica gel, though less efficiently.
Step-by-Step Instructions
- Mix one part borax with two parts yellow cornmeal.
- Spread a 1-inch layer in a cardboard box or open container.
- Place flowers face-up and carefully cover with the mixture, working it between petals.
- Leave uncovered in a dry location for 1–3 weeks.
- Gently pour off the mixture and brush petals with a soft paintbrush.
Advantages
- Inexpensive and accessible
- More natural than silica gel
- Can work for a variety of flower types
Disadvantages
- Less effective than silica gel
- Longer drying time
- Can leave residue in petals
Best Flowers for Borax Drying
Roses, marigolds, and zinnias. Avoid very delicate blooms that may be damaged by the gritty texture.
Estimated Drying Time
1 to 3 weeks.
Common Mistakes to Avoid
- Using too little of the mixture. Flowers need to be fully buried.
- Leaving the mixture wet. If your borax mixture feels damp, it’s absorbed too much moisture — replace it.
11. Hairspray Sealing
When to use it: Hairspray isn’t a standalone preservation method, but it’s a fantastic finishing technique to seal already-dried flowers and extend their life. It can also be used to slow wilting on fresh flowers temporarily.
How It Works
Hairspray forms a light polymer coating over the flower that reduces moisture exchange and prevents petals from falling off.
Step-by-Step Instructions
- Hang dried flowers upside down or hold them by the stem.
- Hold an aerosol hairspray can about 12 inches away from the bloom.
- Apply a light, even coat with a sweeping motion.
- Let dry completely (a few minutes).
- Apply a second light coat if needed.
- Allow to air out before displaying or storing.
Advantages
- Very inexpensive
- Adds rigidity to fragile petals
- Quick and easy to apply
Disadvantages
- Not a true preservation method on its own
- Some hairsprays can cause slight discoloration
- The effect is temporary
Best Flowers for Hairspray
Any already-dried flower benefits from a light coat. Air-dried lavender and roses especially benefit as it reduces petal shedding.
Common Mistakes to Avoid
- Applying too much. Heavy coats make flowers look stiff and unnatural.
- Using hairspray on fresh flowers as a preservation method. It only seals surfaces and won’t stop internal decay.
12. Freeze Preservation (Home Freezer Method)
When to use it: This is different from professional freeze drying and is best for temporary preservation — keeping flowers fresh for a few extra days before an event, or slowing wilting.
How It Works
Cold temperatures significantly slow the metabolic processes that cause flowers to deteriorate. This extends their life without actually drying them.
Step-by-Step Instructions
- Lightly mist flowers with water.
- Wrap loosely in a damp paper towel, then place in a plastic bag with a small amount of air inside.
- Place in the warmest part of your refrigerator (usually the crisper drawer) at about 34–36°F.
- Check daily and re-mist if needed.
- Bring to room temperature slowly before displaying.
Advantages
- Easy and free
- Keeps flowers looking fresh for longer
- Great for preserving flowers for a few days before a special event
Disadvantages
- Not a long-term preservation solution
- Some flowers are cold-sensitive and may develop discoloration
- Tropical flowers like orchids and anthuriums don’t tolerate cold well
Best Flowers for Refrigerator Storage
Roses, carnations, tulips, and lilies do well with this method. Keep them away from fruits, which release ethylene gas that speeds up flower aging.
Estimated Time
Extends freshness by 3–7 additional days.
Common Mistakes to Avoid
- Storing near apples or bananas. These produce ethylene gas which accelerates flower wilting.
- Freezing flowers solid. A regular freezer (not a freeze dryer) will turn flowers to mush when thawed.
Tips for Maintaining Color in Preserved Flowers
Color preservation is one of the biggest challenges in flower drying. Here are the most effective strategies:
1. Start with deeply colored flowers. Lighter pinks and pastels fade more than deep reds, purples, and yellows. Choose the most vibrant specimens from your garden.
2. Dry in the dark. Light breaks down pigments rapidly. Any drying method benefits from a dark environment.
3. Use silica gel for best color retention. Of all the home drying methods, silica gel does the best job preserving natural flower color.
4. Work quickly after cutting. The longer flowers sit in water before drying, the more color they lose.
5. Apply a UV-resistant spray sealant after preservation to slow future fading from light exposure.
Storage Advice for Preserved Flowers
How you store preserved flowers is just as important as how you dry them.
- Keep away from humidity. This is the number one rule. Dried flowers readily reabsorb moisture, which causes mold and limpness.
- Store in a cool, dark location. A closet shelf is ideal. Avoid basements (too humid) and attics (temperature extremes).
- Use airtight containers for silica-dried or freeze-dried flowers when not on display.
- Don’t stack fragile dried flowers. Store flat or hang them to avoid crushing.
- Add silica gel packets to storage boxes to absorb any ambient humidity.
Beginner-Friendly Recommendations
If you’re just starting out with flower preservation, here’s my simple advice: start with air drying and lavender or roses.
Both flowers are forgiving, widely available, and hold up well to the simplest method. Once you’re comfortable and understand how moisture affects flowers during the process, move on to silica gel drying. It’s only slightly more involved but gives dramatically better results.
Don’t try resin casting or microwave drying as your first project — give yourself a few successful batches under your belt first.
Also, take care of your flowers before you harvest them. Healthy, well-cared-for flowers preserve much better than stressed or pest-damaged ones. If you’re growing any flowering plants in your garden, proper plant care always pays off. For example, if you’re working with hibiscus, the advice in this guide on 7 Hibiscus Flower Care Tips That You Need to Know will help you grow blooms worth preserving.
How Garden Design Connects to Flower Preservation
One thing experienced gardeners know is that what you grow around your flowers matters as much as what you grow. Companion planting can improve the health and yield of your flowering plants significantly, which directly affects the quality of blooms available for preservation.
For instance, if you grow flowers near your vegetable garden, understanding good companion planting can help everything thrive. The principles discussed in resources like 6 Plants That Help Lettuce Thrive and Best Companion Plants for Broccoli apply to thinking about your garden as a whole ecosystem. Healthier plants with less pest pressure and better nutrient access produce fuller, more vibrant blooms — exactly what you want when you’re planning to preserve them.
Conclusion
Preserving flowers at home is genuinely one of the most rewarding things you can do as a gardener or plant lover. Every bouquet tells a story, and having the knowledge to preserve that story means it doesn’t have to end when the petals begin to fall.
The 12 methods I’ve walked you through cover every level of skill, budget, and creative goal. If you’ve never tried preservation before, start with air drying — you’ll have dried lavender hanging in your kitchen within the hour. If you’re ready to level up, invest in some silica gel and try it on your next rose harvest. The difference in color and shape retention will genuinely impress you.
And remember: the best-preserved flowers start as the healthiest flowers. Putting time and care into your garden always pays off — not just in what you grow, but in what you get to keep.
Happy preserving.