If you’ve ever walked past a garden bursting with large, trumpet-shaped blooms in shades of red, pink, yellow, and orange, chances are you were looking at hibiscus. These plants have a way of stopping people in their tracks — and honestly, it’s hard not to stare.
But here’s the thing: as stunning as hibiscus flowers are, a lot of gardeners struggle to keep them healthy. The blooms fade early, the leaves turn yellow, or the plant just refuses to flower. Sound familiar?
I’ve been growing hibiscus for over a decade, and I’ve made pretty much every mistake you can make. The good news is that once you understand what this plant actually needs, it becomes one of the most rewarding things you can grow — whether in a pot on your patio or right in the ground in your backyard.
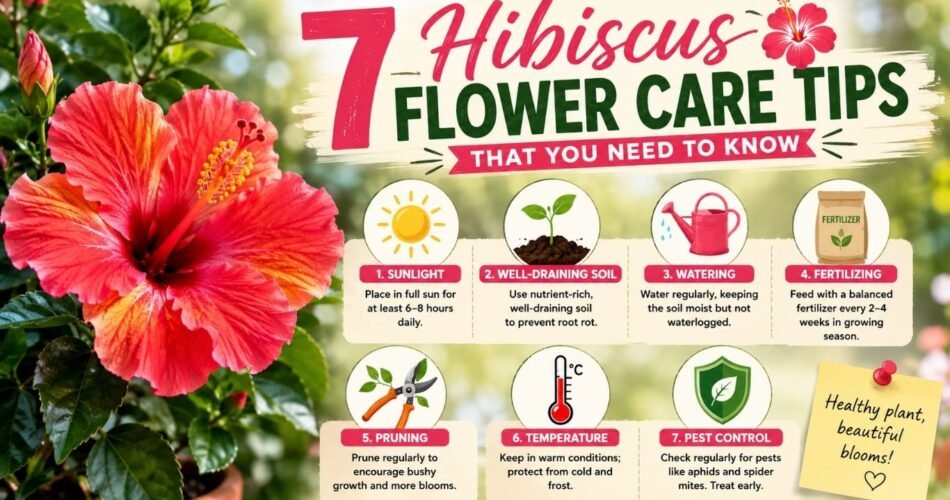
In this guide, I’m going to walk you through 7 practical hibiscus flower care tips that actually make a difference. No fluff, no complicated jargon — just real, hands-on advice that works.
What Makes Hibiscus Such a Special Plant?
Before we dive into the care tips, it helps to understand what you’re working with. There are two main types of hibiscus most home gardeners deal with:
- Tropical hibiscus (Hibiscus rosa-sinensis) — Loves warm weather, grows best in USDA zones 9–12, and is usually grown as a potted plant in cooler climates. This is the one with the glossy leaves and vivid, showy blooms.
- Hardy hibiscus (Hibiscus moscheutos) — Can handle colder winters (zones 4–9), dies back to the ground in fall, and returns each spring. The blooms on this one can get absolutely enormous — we’re talking dinner-plate size.
Both types share similar care needs, though there are a few key differences I’ll point out along the way.
Now, let’s get into the tips.
Tip 1: Give Your Hibiscus the Right Amount of Sunlight
Why Sunlight Is Non-Negotiable for Hibiscus
Hibiscus plants are sun worshippers. Full stop. If there’s one thing you need to get right before anything else, it’s the light situation. These plants need at least 6 hours of direct sunlight per day, and most varieties actually do best with 8 hours or more.
When hibiscus doesn’t get enough light, the symptoms show up fast: fewer blooms, yellowing leaves, leggy stems, and a generally tired-looking plant. I once made the mistake of placing a tropical hibiscus on a porch that got afternoon shade, thinking it would appreciate the relief from the heat. It sulked all summer and barely flowered. Moved it to a sunnier spot the following year, and it exploded with color.
What to Do in Extreme Heat
Now, there is a nuance here, especially in hotter climates. In regions where summer temperatures regularly hit 95°F (35°C) or above, some afternoon shade (around 2–4 PM) can actually help tropical hibiscus avoid heat stress. The goal is bright, consistent morning sun rather than baking midday heat.
Practical tip: If you’re growing hibiscus in containers, you have the advantage of being able to move the plant. Start with full sun and observe how your plant responds during the hottest weeks of summer. Wilting or scorched leaf edges? Move it slightly into partial afternoon shade.
Indoor Hibiscus and Light
For those growing tropical hibiscus indoors during winter, placement near a south-facing window is essential. If natural light is limited, a grow light running for 12–14 hours per day will keep your plant happy until it’s warm enough to move back outside.
Tip 2: Master the Art of Watering Hibiscus
How Often Should You Water?
Watering is where most gardeners trip up with hibiscus. These plants like consistently moist soil, but they absolutely cannot tolerate waterlogged roots. The balance is real, and it takes a little getting used to.
A good rule of thumb:
- During the growing season (spring through summer): Water deeply 2–3 times per week, or when the top inch of soil feels dry.
- In fall: Start tapering off as temperatures drop.
- In winter (for tropical varieties kept indoors): Water sparingly — maybe once a week or less, depending on how dry your indoor air is.
Signs of Overwatering vs. Underwatering
One of the most confusing things for new hibiscus growers is that both overwatering and underwatering can cause yellow leaves and leaf drop. Here’s how to tell them apart:
| Symptom | Overwatering | Underwatering |
|---|---|---|
| Leaf color | Yellow with mushy stems | Yellow-brown with crispy edges |
| Soil feel | Soggy, possibly smelly | Bone dry, pulling away from edges |
| Leaf drop | Soft, limp leaves falling | Dry, brittle leaves falling |
| Root appearance | Dark, mushy roots | Light-colored but thin, fragile roots |
If you suspect overwatering, let the soil dry out completely before watering again. For container plants, check that drainage holes aren’t blocked.
The Container Watering Trap
Container-grown hibiscus dries out much faster than in-ground plants — sometimes needing daily watering during hot summer months. Get in the habit of checking your containers every morning during peak heat. A self-watering pot or adding a layer of mulch on top of the soil can help extend the time between waterings.
Tip 3: Use the Right Soil Mix
What Hibiscus Roots Actually Need
Hibiscus thrives in well-draining, slightly acidic soil with a pH between 6.0 and 7.0. Heavy clay soil is a death sentence for these plants because it holds water around the roots, leading to root rot. Sandy soil, on the other hand, drains too fast and dries out before the roots can absorb enough moisture.
The sweet spot is a loamy, organically rich soil that holds just enough moisture while still allowing excess water to drain freely.
Improving Your Garden Soil
If your native soil is clay-heavy, amend it before planting. Here’s a simple mix that works well:
- 50% native garden soil
- 30% compost or aged organic matter
- 20% perlite or coarse sand for drainage
For container planting, I recommend a high-quality potting mix (not garden soil, which compacts in pots) combined with about 20% perlite. Some gardeners also add a small amount of orchid bark to improve aeration.
Mulching Matters Too
A 2–3 inch layer of organic mulch (wood chips, shredded bark, or straw) around the base of your hibiscus helps regulate soil moisture, keeps roots cool in summer, and suppresses weeds. Just make sure to keep the mulch a few inches away from the main stem to prevent rot.
This kind of thoughtful soil management isn’t just important for hibiscus — it applies to many garden plants. If you’re interested in creating healthier growing environments for your vegetables too, check out this helpful guide on 6 Plants That Help Lettuce Thrive, which offers some great insights into soil health and companion planting strategies.
Tip 4: Fertilize Thoughtfully for Maximum Blooms
The Nutrient Needs of Hibiscus
Hibiscus is a heavy feeder, meaning it benefits significantly from regular fertilization during the growing season. But here’s where many gardeners make a critical mistake: they reach for a general-purpose high-nitrogen fertilizer and wonder why their plant looks lush and leafy but produces almost no flowers.
The key is understanding the NPK ratio on fertilizer labels:
- Nitrogen (N): Promotes leafy, green growth
- Phosphorus (P): Supports root development and flowering
- Potassium (K): Overall plant health and disease resistance
For hibiscus, you want a fertilizer that’s lower in nitrogen and higher in phosphorus and potassium. Look for ratios like 10-20-20 or 12-4-8. Specialty hibiscus fertilizers are also available and take the guesswork out of it.
How Often to Fertilize
- Spring through summer: Feed every 2–4 weeks with a balanced liquid fertilizer or slow-release granules once a month.
- Fall: Reduce feeding frequency significantly as growth slows.
- Winter: Stop fertilizing almost entirely for tropical varieties indoors; hardy hibiscus is dormant and needs nothing.
Organic vs. Synthetic Fertilizers
Both work, but organic options like fish emulsion, compost tea, or worm castings offer the added benefit of improving soil biology over time. Synthetic fertilizers work faster but can build up salts in container soil if overused. If you use synthetics, flush your container soil with plain water every few months to prevent salt accumulation.
Warning: Over-fertilizing with high nitrogen can cause bud drop. If your hibiscus is forming buds but dropping them before they open, too much nitrogen is often a culprit.
Tip 5: Prune at the Right Time and in the Right Way
Why Pruning Is Essential (Not Optional)
Pruning hibiscus isn’t just about keeping the plant looking tidy — it’s genuinely important for encouraging new growth and more blooms. Hibiscus flowers bloom on new wood, meaning new stems that have grown during the current season. When you prune correctly, you stimulate the plant to push out more of those new stems.
When to Prune Hibiscus
- Tropical Hibiscus: Prune in early spring before new growth begins, or lightly throughout the growing season to shape the plant. Avoid heavy pruning in fall or winter.
- Hardy Hibiscus: Cut back dead stalks to about 4–6 inches above the ground in late fall or early spring. Don’t be alarmed if it seems like nothing is happening in spring — hardy hibiscus can be slow to emerge, sometimes not showing new growth until late May or even June.
- Rose of Sharon: Prune in late winter or early spring before new growth appears.
How to Prune Without Damaging the Plant
Use clean, sharp pruning shears — dull blades crush stems rather than cutting cleanly, creating entry points for disease. For each cut:
- Make the cut at a 45-degree angle just above a leaf node or bud.
- Remove any dead, damaged, or crossing branches first.
- Aim to cut back by no more than one-third of the plant’s total size in a single session to avoid shocking it.
After pruning, sanitize your shears with rubbing alcohol or a diluted bleach solution before moving on to another plant. It takes 30 seconds and prevents spreading fungal or bacterial issues between plants.
Tip 6: Stay Ahead of Pests and Diseases
The Most Common Hibiscus Pests
Even healthy, well-tended hibiscus plants can attract pests. Knowing what to look for and catching problems early makes a huge difference.
Aphids: Tiny, soft-bodied insects (often green or black) that cluster on new growth and undersides of leaves. They suck plant sap and excrete a sticky substance called honeydew that can lead to sooty mold. A strong blast of water from a hose usually dislodges them, or treat with neem oil spray.
Spider Mites: Barely visible to the naked eye, these tiny pests thrive in hot, dry conditions. Look for fine webbing on leaf undersides and a stippled, bronze appearance to the leaves. Increase humidity around the plant and use insecticidal soap or neem oil.
Whiteflies: Small, white flying insects that scatter when you disturb the plant. They’re particularly problematic for tropical hibiscus grown indoors. Yellow sticky traps help monitor populations, and neem oil works well as a treatment.
Thrips: These slender, tiny insects cause distorted leaves and silvery streaking. They’re tricky to spot but show up in flowers as well. Spinosad-based sprays are effective.
Mealybugs: White, cottony clusters found at stem joints and leaf undersides. Treat with a cotton swab dipped in rubbing alcohol for small infestations, or use insecticidal soap for larger outbreaks.
Common Hibiscus Diseases
Root Rot: The number one disease problem, almost always caused by overwatering or poor drainage. Prevention is the best cure — fix your watering habits and soil before rot takes hold.
Powdery Mildew: A white, powdery coating on leaves, usually appearing in humid weather with poor air circulation. Improve airflow around the plant, avoid overhead watering, and treat with a diluted baking soda solution or fungicide.
Leaf Spot: Fungal or bacterial spots on leaves that may turn yellow and drop. Remove affected leaves and avoid wetting the foliage when watering. Copper-based fungicides can help with persistent cases.
Integrated Pest Management (IPM) Approach
Rather than immediately reaching for chemical sprays, try a layered approach:
- Physical removal: Hand-pick insects or use water to dislodge them.
- Biological control: Encourage beneficial insects like ladybugs and lacewings that prey on aphids.
- Organic treatments: Neem oil, insecticidal soap, or diatomaceous earth.
- Chemical treatments: Only as a last resort, using the least toxic option available.
A healthy plant with the right light, water, and nutrition is naturally more resistant to pests and diseases. Stressed plants are always more vulnerable.
Tip 7: Adjust Your Care Routine With the Seasons
Spring: Time to Wake Your Plant Up
Spring is the most exciting time for hibiscus growers. As temperatures rise and days lengthen, your plant is ready to push out new growth with enthusiasm.
Spring to-do list:
- Prune back dead or weak stems.
- Start watering more regularly as the soil dries faster.
- Begin fertilizing once new growth appears.
- Move container plants back outside once nighttime temperatures stay consistently above 50°F (10°C).
- Check for early pest activity and treat promptly.
Summer: Peak Growing Season Management
Summer is bloom season for most hibiscus varieties. Your job during these months is to keep up with watering, fertilizing, and deadheading spent blooms.
One useful habit: deadheading (removing spent flowers) keeps the plant looking clean and can encourage additional blooming, though it’s less critical for hibiscus than for some other flowering plants since many varieties drop their blooms naturally.
Watch closely during heat waves. Even sun-loving hibiscus can experience heat stress when temperatures climb above 95°F (35°C) for extended periods.
Fall: Preparing for the Transition
As temperatures begin to drop in autumn:
- For tropical hibiscus: Start reducing watering and stop fertilizing by early fall. Plan to bring container plants indoors before the first frost.
- For hardy hibiscus: Let the plant naturally die back. Once frost has killed the top growth, cut it down to 4–6 inches and add a thick layer of mulch over the root zone for insulation.
- For Rose of Sharon: No major action needed — just enjoy the extended bloom season that often runs into fall.
Winter: Rest and Preparation
Winter care depends almost entirely on your climate and hibiscus type.
Tropical hibiscus indoors: Place near your brightest window, cut back on watering significantly, stop fertilizing, and accept that it may look a little sad. That’s okay. It’s resting. Maintain indoor temperatures above 55°F (13°C) at minimum.
Hardy hibiscus outdoors: The roots are protected underground. Add extra mulch in areas with harsh winters. Don’t panic if the plant shows zero signs of life until late spring — this is completely normal.
Common Hibiscus Care Mistakes to Avoid
Even experienced gardeners make these errors. Knowing them in advance can save you a lot of frustration.
1. Moving plants too abruptly: If you’re transitioning a hibiscus from indoors to outdoors (or vice versa), do it gradually over 7–10 days. Sudden environmental changes cause leaf drop and stress.
2. Planting in the wrong location: A spot that gets 3–4 hours of sun won’t cut it. Choose your location carefully before planting.
3. Using wrong fertilizer: High nitrogen fertilizer encourages leaf growth at the expense of flowers. This is one of the most common reasons hibiscus won’t bloom.
4. Ignoring container drainage: Pots without drainage holes or blocked drainage holes are a fast path to root rot. Always check drainage before planting.
5. Panicking about slow spring emergence: Hardy hibiscus is notoriously late to show signs of life in spring. Many gardeners accidentally dig up a perfectly healthy plant thinking it’s dead.
6. Watering on a rigid schedule: Water based on soil condition, not the calendar. Soil dries at different rates depending on temperature, humidity, pot size, and plant size.
7. Skipping winter mulch: Even in zone 6 or 7, a cold snap without adequate root insulation can kill an otherwise hardy hibiscus. Mulch is cheap insurance.
Understanding the relationship between plants in your garden ecosystem matters for hibiscus too. Just as thoughtful plant combinations can protect and boost vegetable crops — like with the Best Companion Plants for Broccoli — placing hibiscus strategically near windbreaks, taller plants for partial afternoon shade, or companion plantings can improve its overall performance and health.
Frequently Asked Questions About Hibiscus Care
1. Why is my hibiscus not blooming?
The most common reasons hibiscus fails to bloom are insufficient sunlight (less than 6 hours daily), too much nitrogen fertilizer, overwatering, or improper pruning that removed new wood where buds would have formed. Review your light conditions first, then check your fertilizer’s NPK ratio.
2. How do I know if my hibiscus has root rot?
Signs of root rot include yellowing leaves, mushy stems near the soil line, a foul smell from the soil, and wilting that doesn’t improve after watering. If you suspect root rot, gently remove the plant from its pot, trim away any black or mushy roots with sterile scissors, dust with sulfur powder or cinnamon (natural antifungals), and repot into fresh, well-draining soil.
3. Can hibiscus survive winter outdoors?
It depends on the variety. Hardy hibiscus (Hibiscus moscheutos) can survive winters in zones 4–9 when properly mulched. Tropical hibiscus will die if exposed to frost and must be brought indoors or treated as an annual in cold climates. Rose of Sharon falls somewhere in between, handling cold down to zone 5 with minimal protection.
4. How often should I repot my container hibiscus?
Repot every 1–2 years, or when you notice roots growing out of the drainage holes or the plant drying out unusually fast. Go up only one pot size at a time — too large a pot holds excess moisture and can lead to root rot.
5. Is hibiscus toxic to pets?
The hibiscus species most commonly grown in gardens (Hibiscus rosa-sinensis) is considered mildly toxic to cats and dogs, potentially causing gastrointestinal upset, vomiting, or diarrhea if ingested. While it’s not typically life-threatening, it’s worth keeping curious pets away from your hibiscus plants. Always consult your veterinarian if you suspect your pet has eaten any plant.
6. Why are my hibiscus leaves turning yellow?
Yellow leaves can result from overwatering, underwatering, nutrient deficiency (especially iron or magnesium), cold temperatures, natural leaf aging, or pest damage. Check your watering habits first, then consider whether recent temperature drops might be a factor. Yellowing between leaf veins often indicates an iron deficiency, which can be addressed with chelated iron supplements.
7. When is the best time to plant hibiscus?
The best time to plant hibiscus is in spring, after the last frost date in your area, when temperatures are consistently warming. This gives the plant an entire growing season to establish its root system before facing any winter stress. Container-grown plants can technically be planted any time during the growing season, but spring remains ideal.
Key Takeaways
Here’s a quick summary of everything we covered:
- Sunlight: At least 6 full hours of direct sun per day is essential.
- Watering: Keep soil consistently moist but never waterlogged. Check soil moisture before watering, not the calendar.
- Soil: Well-draining, slightly acidic soil with good organic content. Amend heavy clay with compost and perlite.
- Fertilizing: Use low-nitrogen, higher-phosphorus fertilizers during the growing season. Feed every 2–4 weeks in spring and summer.
- Pruning: Prune in spring to stimulate new growth. Hibiscus blooms on new wood, so proper timing matters.
- Pests and Diseases: Inspect regularly, start with the least invasive treatments, and maintain overall plant health as the best defense.
- Seasonal Care: Adjust watering, fertilizing, and pruning based on the time of year and your local climate.
Final Thoughts
Hibiscus plants reward attentive gardeners generously. When you give them the right conditions — plenty of sun, consistent moisture, well-draining soil, and appropriate nutrition — they respond with a stunning display of blooms that can last from late spring through fall.
The key is developing the habit of observing your plant regularly. Check the leaves. Feel the soil. Notice when something looks off and address it early rather than waiting for the problem to escalate. Most hibiscus problems are fixable if caught early.
Don’t let the idea of “high-maintenance” scare you off. The care requirements I’ve outlined here quickly become second nature once you’ve been through one full growing cycle with your plant. By the second year, you’ll be the gardener other people ask for advice.
Start with one tip at a time if you’re feeling overwhelmed. Fix the watering first. Then look at the light. Work through the list. Your hibiscus will tell you when things are improving — with big, beautiful blooms that make all the effort completely worth it.
Happy growing!